 The Cozy Cookbook is here!
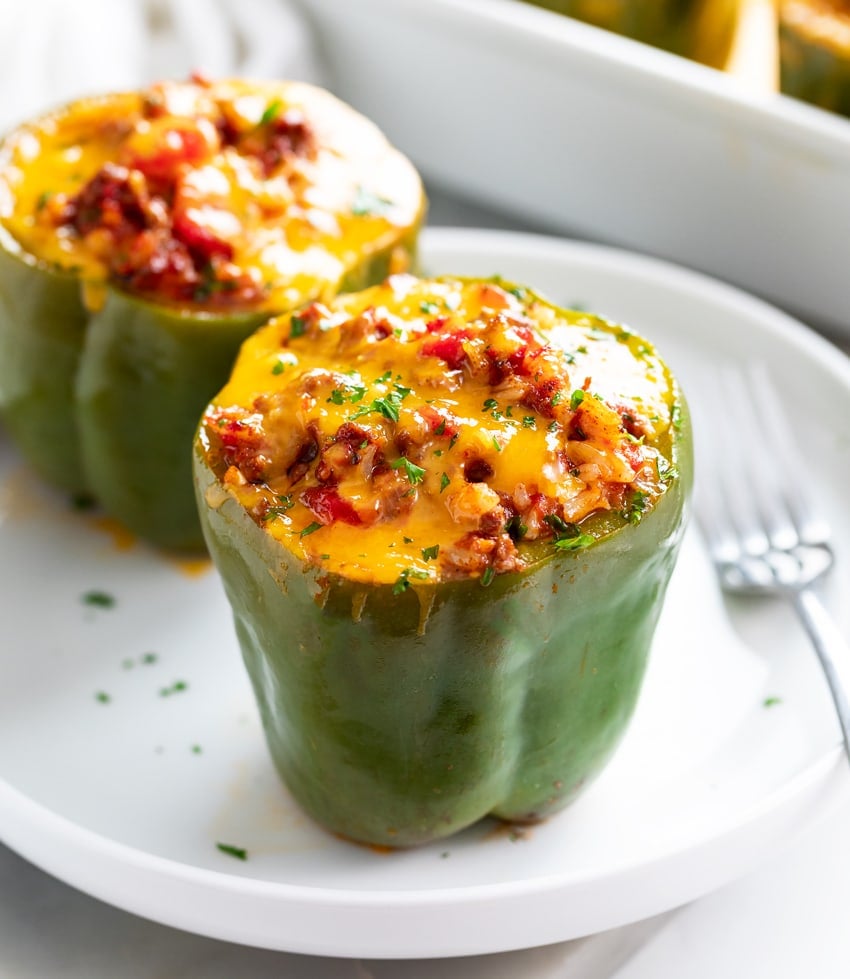
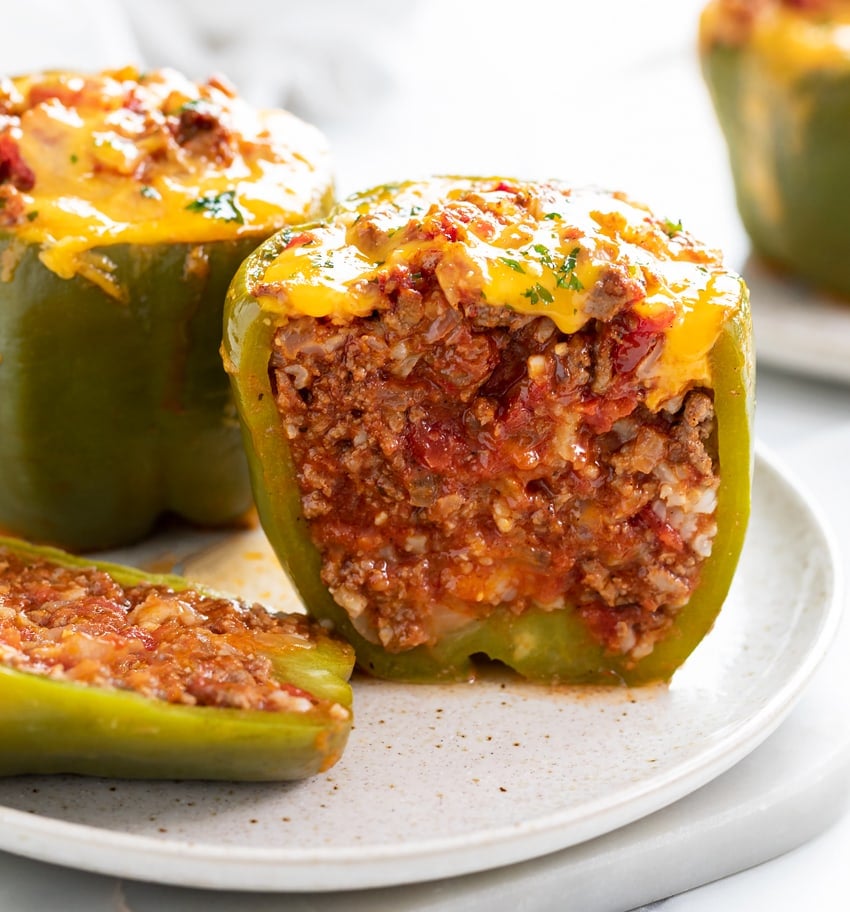
 These Stuffed Bell Peppers are an easy and healthy dinner recipe that you can make with a variety of filling options, including ground beef, turkey, rice, cheese, tomatoes, and more!
Be sure to try my Egg Roll in a Bowl recipe next!
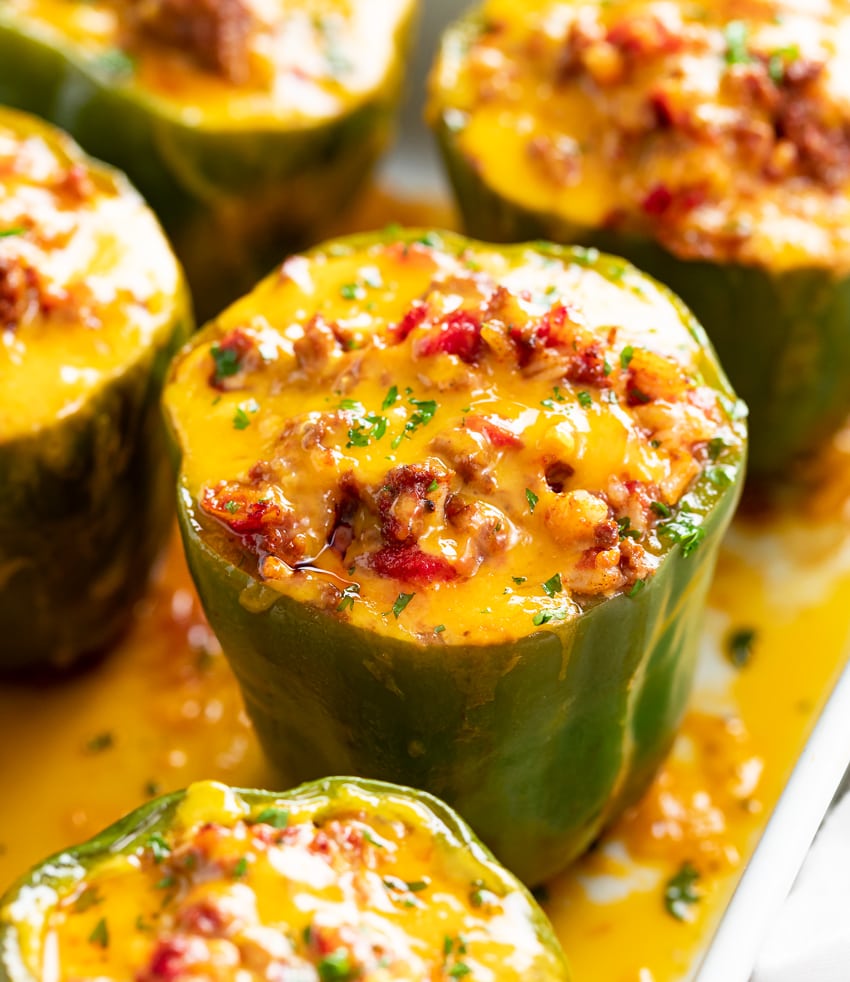
Stuffed Bell Peppers
Stuffed Peppers are a must all year round, and there’s no better way to make use of fresh garden peppers than with this recipe. It’s hearty, delicious, easy to customize, and makes a great make-ahead meal.
Trust me when I say, this filling is like no other filling you’ve ever tried. The traditional components include ground beef and sausage along with garlic, onions, diced tomatoes, tomato sauce, rice, and cheddar cheese.
The ingredients that make this better than any other are the chicken broth (depth of flavor), Worcestershire and hot sauce (flavor enhancers, the hot sauce doesn’t make it spicy), and the brown sugar (a hint of sweetness to offset the acidity from the tomatoes).
This is definitely one recipe your family will want again and again. Be sure to check out my pro tips below!
How to Make It
See recipe card below this post for ingredient quantities and full instructions.
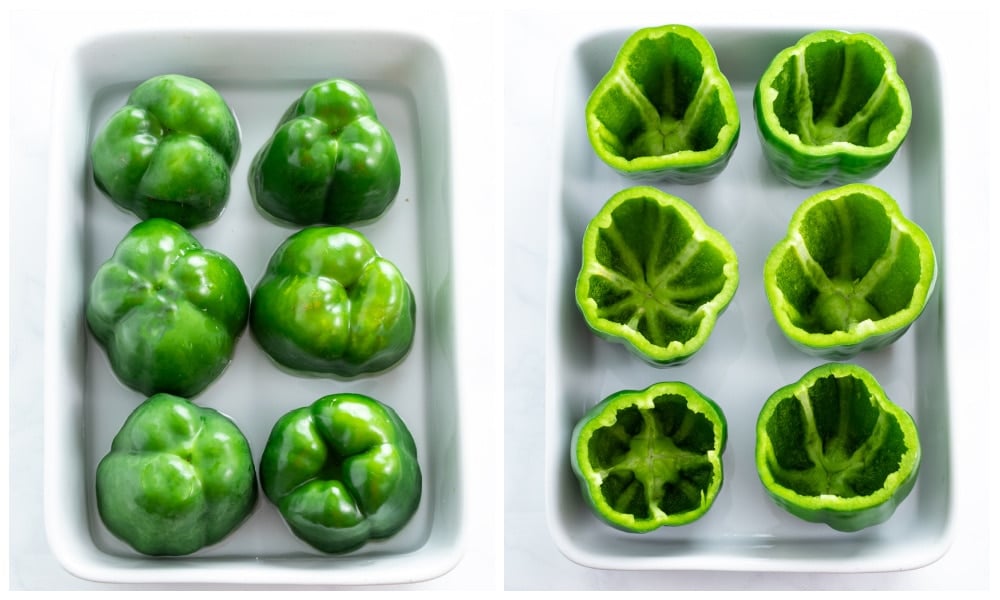
Slice the top off of the peppers and remove the seeds/membranes. Place them top-side-down in a casserole dish with water. Cover and steam them for 20 minutes. Remove water and place the peppers back in the casserole dish. While the peppers steam, prepare the filling.
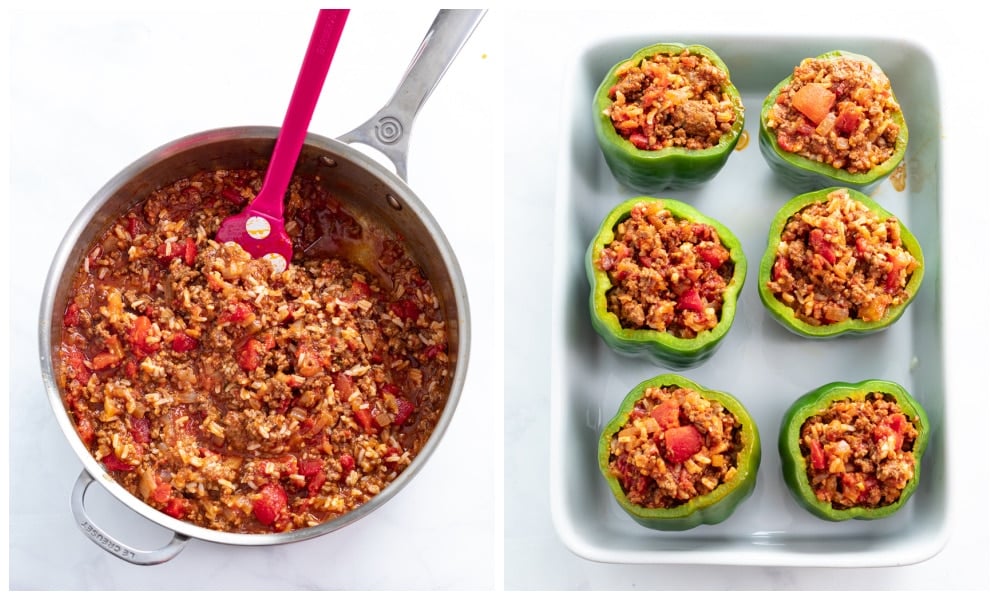
Prepare the meat/sauce/rice mixture and fill the middle of each bell pepper. Cover and bake for 20 minutes.
Remove cover and top with cheese. Bake uncovered for 10 minutes, or until the cheese is melted and the peppers are tender. Remove and serve!

Do You Have to Cook Peppers Before Stuffing Them?
- Some recipes call for boiling, blanching, or steaming bell peppers before stuffing them, while others leave the peppers raw. No matter what, the peppers require at least 50 minutes of cooking time to have the ideal finished texture.
- For this reason, I like to let the peppers steam in the casserole dish for 20 minutes in the oven while the filling is being prepared. This cuts down on overall preparation time as we’re overlapping tasks, but also allows the pepper to release some water as well, (raw bell peppers are 92% water).
Make Ahead Method
- Steam the peppers and prepare the filling as outlined. Stuff each pepper.
- Cover and refrigerate for up to 2 days or freeze for up to 3 months.
- Let frozen peppers thaw completely before baking.
- When ready to bake, cover and bake at 350° for 45 minutes if baking from a cold state. Remove the cover and top with cheese. Bake for 10 more minutes, or until the cheese is melted and the pepper is tender.
Pro Tips
- You can use any combination of meat that you want to equal 1 ¼ lbs. Ground beef, sausage, turkey and pork are great.
- The hot sauce is a flavor enhancer and doesn’t make this spicy. I used Frank’s Hot Sauce.
- If you do want to kick up the heat, add a little extra hot sauce, a pinch of cayenne, and diced tomatoes with green chilies instead of regular diced tomatoes. Hot Habanero cheese can also be used instead of regular cheddar.
- Choose peppers that are close to the same size so that they cook at the same rate.
- The bottom of the peppers should be relatively flat so that they can stay upright. If needed, take a very thin slice of the bottom of each pepper (without creating a hole), to make it stand more upright. If you accidentally cut too much, take the piece that you’ve cut off and insert it in the same spot on the inside of the pepper to ensure that filling stays inside.
- The tops of the peppers can be diced and added to the meat mixture when the garlic is added, or they can be saved for another recipe!
- Other colors can be used other than green peppers if desired.
- It may seem counterintuitive to use chicken broth for the beef filling in this recipe, but it adds a delicious depth of flavor that contrasts well with the beef.
- I use Cracker Barrel Sharp Yellow Cheese for this recipe. Mozzarella or Monterey Jack are great choices as well.
- Cauliflower rice can be used instead of regular rice to make this keto friendly.
Storage
- Store in an airtight container and refrigerate for up to 3 days or freeze for up to 3 months.
- Leftovers can be reheated in a microwave or in a covered casserole dish at 350° for 15-20 minutes.
Tools For This Recipe
(Amazon affiliate links)- Check out all of my kitchen essentials here.
- 9 x 13-inch Casserole Dish
- Chef’s Knife
- Cheese Grater– Cheese shredded fresh from a block will melt and taste better than packaged shredded cheese.
- Better Than Bouillon– This is what I always use for broth in my recipes. It takes very little space and makes it easy to measure out customized amounts of broth.
Try These Next
-

- Shrimp Fra Diavolo
-

- Chicken Parmesan
-
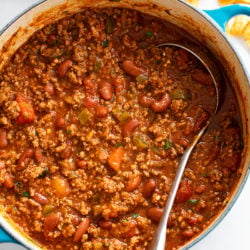
- Easy Chili Recipe
-

- Baked Ravioli
-
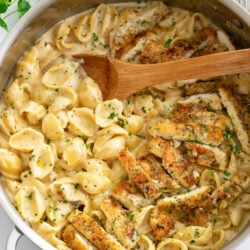
- Creamy Chicken Pasta
-

- Manicotti
Get My Free Meal Plan
I’ve got a Free Meal Plan with 7 of my super popular recipes (complete with grocery list)! Sign up for my email list and I’ll send it over now along with weekly dinner recipes!
And follow me on Facebook, Instagram, and Pinterest!
Tried This Recipe?
Leave a review, I love hearing your feedback! ⭐⭐⭐⭐⭐

Stuffed Bell Peppers
Ingredients
- 6 bell peppers, of roughly equal size
- 1-2 tablespoons olive oil
- ¾ lb. ground beef
- ½ lb. ground Italian sausage, spicy or mild
- 1 small yellow onion, diced
- 3 cloves garlic, minced
- Salt/Pepper
- 1 teaspoon Italian seasoning
- 2 tablespoons tomato paste
- 1 tablespoon brown sugar
- 14.5 oz. diced tomatoes, undrained
- 1 ½ cups marinara sauce, I love Rao’s
- ½ cup chicken broth
- 1 teaspoon Worcestershire sauce
- 1 teaspoon hot sauce
- 1.5 cups cooked rice
- 1 ½ cups cheddar cheese, shredded
Instructions
- Preheat oven to 350 degrees. Add 1 ½ cups water to a 9x13-inch casserole dish. Cut the tops of each pepper and remove the seeds/membranes.
- Place the whole peppers top-side-down in the casserole dish. Cover with foil and bake for 20 minutes. Remove water from the casserole dish once finished and set the peppers aside.
- While the peppers steam, prepare the filling.
- Heat the olive oil in a large skillet over medium-high heat. Add the ground beef and sausage and season it with salt and pepper. Cook and crumble it for 3 minutes. Add the onions and cook for 5 more minutes, or until the meat is brown and cooked through. Drain grease. Reduce heat to medium and add garlic and Italian seasoning.
- Add the tomato paste and brown sugar and stir to combine. Add the diced tomatoes, marinara sauce, chicken broth, Worcestershire sauce, and hot sauce. Bring to a boil, then reduce to a simmer. Let it bubble gently and reduce/concentrate for 15 minutes or until little excess liquid remains. Stir in the cooked rice and heat through for 1-2 minutes. Remove from heat.
- Fill each pepper with an even amount of filling and place in the casserole dish. Cover and bake for 20 minutes. Remove cover and top with cheese. (If there is any excess space around the edges of the pepper, I like to push cheese down into those spaces.) Bake for 10 more minutes, or until the cheese is melted and the peppers are tender. Serve!
Notes
- You can use any combination of meat that you want to equal 1 ¼ lbs. Ground beef, sausage, turkey and pork are great.
- The hot sauce is a flavor enhancer and doesn't make this spicy. I used Frank's Hot Sauce.
- If you do want to kick up the heat, add a little extra hot sauce, a pinch of cayenne, and diced tomatoes with green chilies instead of regular diced tomatoes. Hot Habanero cheese can also be used instead of regular cheddar.
- The tops of the peppers can be diced and added to the meat mixture when the garlic is added, or they can be saved for another recipe!
- Cauliflower rice can be used instead of regular rice to make this keto friendly.
Make-Ahead Method
- Steam the peppers and prepare the filling as outlined. Stuff each pepper.
- Cover and refrigerate for up to 2 days or freeze for up to 3 months.
- Let frozen peppers thaw completely before baking.
- When ready to bake, cover and bake at 350° for 45 minutes if baking from a cold state. Remove the cover and top with cheese. Bake for 10 more minutes, or until the cheese is melted and the pepper is tender.
Storage
- Store in an airtight container and refrigerate for up to 3 days or freeze for up to 3 months.
- Leftovers can be reheated in a microwave or in a covered casserole dish at 350° for 15-20 minutes.
Nutritional information is an estimate and is per pepper. This recipe makes 6 stuffed peppers.


Absolute fire! I only wish i made more of the sauce that was mixed into the meat and rice mixture to have as a sauce on the side!!! Will definitely keep this recipe close. Thanks for sharing
You’re very welcome Sean, I’m so happy this was fire! Wahooo! Thanks so much for the great comments and review!🔥
Absolutely DELICIOUS. So much flavor. I made extra filling and froze it for the next batch. Stephanie is a genius
Awwwww thanks so much Brenda… not sure I’ve ever been called a genius before but I’ll take it 😂! I’m so happy you liked this one!
Followed the recipe as is and my husband loved it. First time for me making stuffed peppers, as I am not a fan of rice in anything but the sauce is to die for. Will try to use the sauce on pasta.
I’m so happy you liked the sauce Linda, I love that you’re going to experiment with it!💕
This recipe was DELISH!!! I’ve never made them before but it was one of my grandma’s specialties. This recipe delivered! I made it with fire roasted tomatoes and as a nod to my gram, I topped each pepper with a spoonful of tomato soup, baked for 20 minutes, topped with cheddar and baked again until melty. Also did as you suggested and added 1 chopped pepper top to the mix. My family LOVED these and I have to say, probably the best I’ve ever had. Thanks, Stephanie. I’m now a regular to your website because you cook like I do.
Wow such great comments Lisa, I love that it was such a hit with your family! Thanks so much for the great review and for sharing how you tweaked it! ❤️
I just made these stuffed peppers for supper and even though I cut them differently, they were delicious! Thank you for the recipe!
You’re very welcome Joan, thanks so much for the great review, I’m so happy you liked them!💗
I’d always made these the way my mom taught me. This recipe was more work but the end result was so much better. Everyone loved them. I can’t wait for my mom to try these.
I’m so happy everyone loved these Tracy, thanks so much for the great review!❤️
I used to make these all the time. Now that I am a household of only one it almost seems like to much trouble. However, now when I make a batch I eat one and freeze the rest I pour the tomato soup over them. and then bake them. They heat up quite nicely in the microwave.
Great advice Carolyn, thanks so much for sharing!❤️
I always pre-cook my peppers in the microwave. It’s so much easier and faster. I put the cleaned peppers upside down on paper towels in a plate a nd nuke them 4-5 minutes on high.
Nice, great tip! I bet you’d like them even more if you steam them in the microwave! (Unless that’s what you already do!) You’d put the baking dish in the microwave with 1 inch of water and cover it with a microwave cover, and cook for the same amount of time. I bet they’d be a little more tender! Thanks for the tip!!
Outstanding recipe. This is the first year I have actual garden peppers so I’m so excited to stuff them!!!! Love the tip about making the bottoms flat. I did accidentally make a hole in the bottom but i put the piece inside the pepper as you suggested and it was a great patch. The meat stuffing mix is phenomenal just as you have outlined. I am going to stuff a bunch and freeze them so I can eat them this winter. I’m REALLY impressed with this recipe! Thank you.
Thanks so much Jenna, I can’t wait for you to try this with all your peppers! It’s such a fun use for them. Thanks so much for taking the time to leave a comment!❤️
Getting ready to try these delish sounding stuffed peepers.
Did you use regular sausage or Italian. I purchased ground mild Italian.
HI Deb! I am sooo excited for you to try these, I would love to know what you think afterwards! 🙂 I used ground mild Italian sausage, exactly what you got! I should have specified that, I will update it now! Thank you so much! -Stephanie